LED DISPLAY INSTALLATION
A. Confirmation of Installation Type
Based on different application areas of LED display, installation is divided into a variety of types including fixed installation, rental hanging installation, sports perimeter installation. Based on different operational environment of LED display, installation can be divided into a variety of types as well. Clients can choose installation type and set up mount structure according to practical situation. Below is focused on introduction about Wall Mounting Type, Wall embedded Type, Column Type, Building Roof Type, Moveable Type, Rental Hanging Type and Curve Type.1. Wall Mounting Installation
a. Generally used for indoor and semi-outdoor.
b. If active display area is small, there is often no access to maintain, and will remove the whole led display to repair or make frame folded-in-one.
c. If active display area is Slightly larger, generally adopt front maintenance design(frontage maintenance design, usually adopt line assembly).
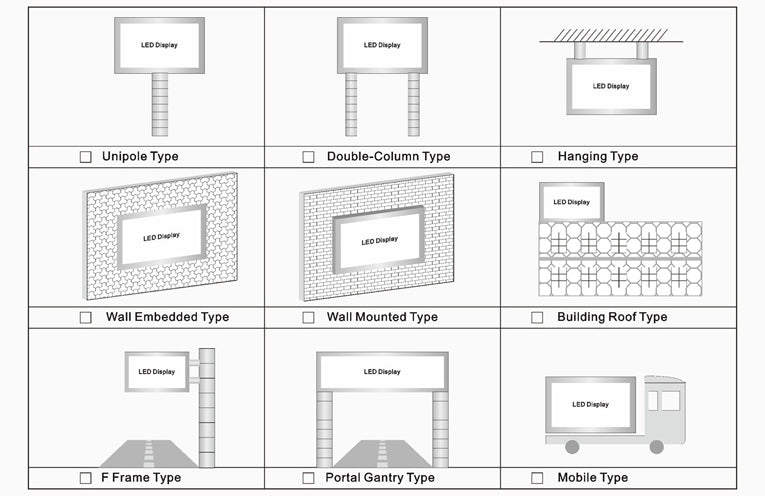
2. Column Installation
There are a variety of column installation types, generally for outdoor advertising applications, as follows:
a. Single column installation type: applicable for small screen.
b. Double column installation type: applicable for large screen.
c. Closed maintenance channel: applicable for simple cabinet .
d. Opened maintenance channel: applicable for standard cabinet.
3. Mosaic Installation/Wall Embedded Installation
a. The whole LED display is embedded in the wall, and display plane and wall are at the same level.
b. To adopt simple type cabinet design.
c. Generally adopts front maintenance (frontage maintenance design).
d. This installation is suitable for indoor and outdoor, while generally used for small pixel pitch and small LED screen.
e. Generally used for building entrance, building lobby.etc.
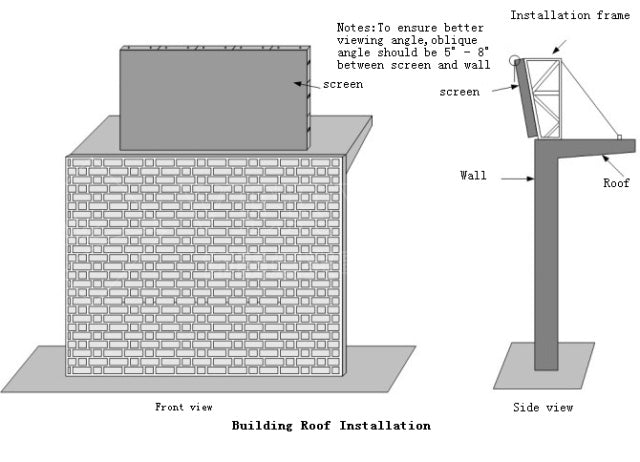
4. Building Roof Installation
a. For this type the wind-resistance is mainly key.
b. Generally installed with a tilt angle, or the module design with 8° oblique.
c. Mainly for outdoor advertising application.
5.Curve Installation
Generally Customer Requires:
● Screen Length x Width(Height):LxW.
● Screen width W: the screen width, here also means the screen height.
● Screen length L: the screen length
● The length of screen could be initially worked out by the perimeter of circle or curve, and then divided by the module length to get the number of modules.
● For round LED display, try to dived it into 92 modules, try to determine the module number of a line with integer multiple of 2, 3,4,5,6, for it is convenient for cabinet dividing and production. The gradient of module is 2 degrees (on both directions), so each module has 4 degrees, and thus, 92 modules can be usually form a perfect circle, it’s better not less than 60 modules.
● After determining the number of modules in a row, the length of the screen can be derived.
● Screen length L= Module number x Module length
● Screen size A=L x W
● For non-circular screen (curve screen), that is simply divided as needs, like cutting cakes.
● The installation rack should be customized according to the size of the round screen or curve screen.

6. Hanging Installation for Rental
a. Display screen size is determined by common screen.
b. Hanging display screen is inadvisable to be large, generally requires below 6Mx10M except the curtain display screen.
c. The top is equipped with hanging beam, and the bottom is equipped with bottom beam. Hanging beam is used for hanging rental LED display.
d. In pale(vertically), cabinets are connected with hanging mechanism, while for side-to-side setup(transversely), cabinets are locked rigidly.
e. he type of hanging mechanism is divided into: gear wheel, cone-rod, and bolt.
f. Gear Wheel is expensive but beautiful.
g. Cone-rod is moderately priced and reliable.
h. Bolt is the cheapest, reliable, but troublesome for assembling, and not suitable for repeated disassembly.
B. LED Display Installation Process
● Outdoor Fixed installationLED display connection sketch map:
1. Preparation of Installation Tools
①M10×60MM Screw
②M10×20MM Screw
③M10 Hexagon Wrench
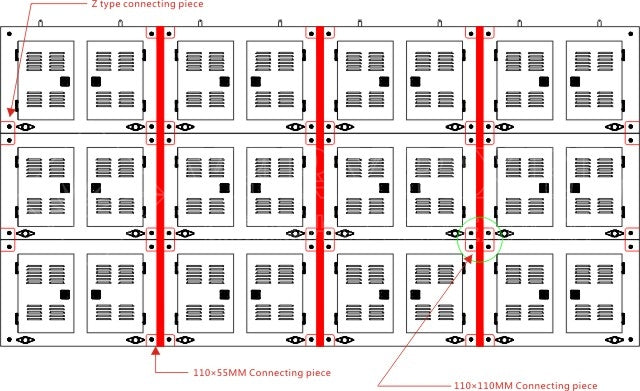
④110×55MM connecting piece
⑤110×110MM connecting piece
⑥Z type connecting piece
2. Cabinets’Connection and Fixation
Notes: pay attention to keeping the assembling in the same level when assembling the first row cabinets, otherwise, the more stacked up, the larger gap. After putting the first cabinets on the steel structure, please screw up the installation iron sheet(i.e installation boards) and 40# steel structure with corresponding screws but not be too tight in order to adjust the level line. When confirm all the cabinets are in the same level, you can tighten them.
3. Connection of Power Cables and Signal Cables
3.1 Different Kinds of Cables

Short signal cable to connect the receiving cards in different cabinet

Long signal cable to connect PC and LED display
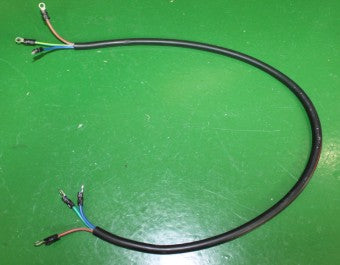
3PIN 2.5sqm short power supply cable to connect the terminal and cabinet
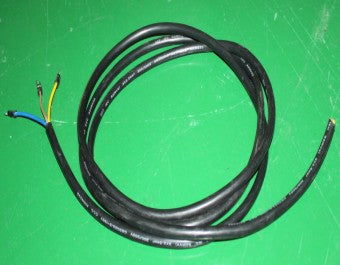
3PIN 2.5sqm long power supply cable to connect the LED display and electric closet
● Note: L – brown color N – blue color G – yellow and green dual color
3.2 Schematic diagram of connection
4. Sending Card's Installation and Connection
4.1 The installation places of DVI and sending card in the mainframe computer
4.2 Cables' Connection outside Computer Mainframe
5. Connection Between Net Cable and Controller
6. The Full View after Installation
● Hanging Rental Installtion
1. To prepare installation tools: power cable, net cable, Hexagon Wrench.
2. To Fix hanging beam and cabinets.
3. To put hanging beam on the top of cabinets, then bolt the hanging beam to the cabinets.
4. Lock the buckles between hanging beam and cabinets.
5. To pull up the hanging beam to make the cabinets suspending, then set the bottom beam.
6. After finishing setting the bottom beam, lock screws to the cabinets.
7. To pull the hanging beam and first line cabinets higher,then install the second line.
8. To Install the second line in order according to the numbers on back of cabinets.
9. Lock the bolts and buckles between the first line and the second line after installing the second line.
10. Connecting power cable and signal cable according tothe indications on display screen's interfaces.
11. The full view of hanging rental display after installation.
● After completing LED display installation, then begin the control system commissioning or debugging.